We program and integrate Beckhoff controls. Call us if you need help programming or starting up a Beckhoff system.
Posted to Beckhoff Blog on Aug 20, 2009
You can quickly develop .NET applications in Visual Studio that target Beckhoff Windows CE controllers. At some point, it always becomes essential to connect to the device from Visual Studio, and debug the application online, running on the device hardware and not just an emulator.
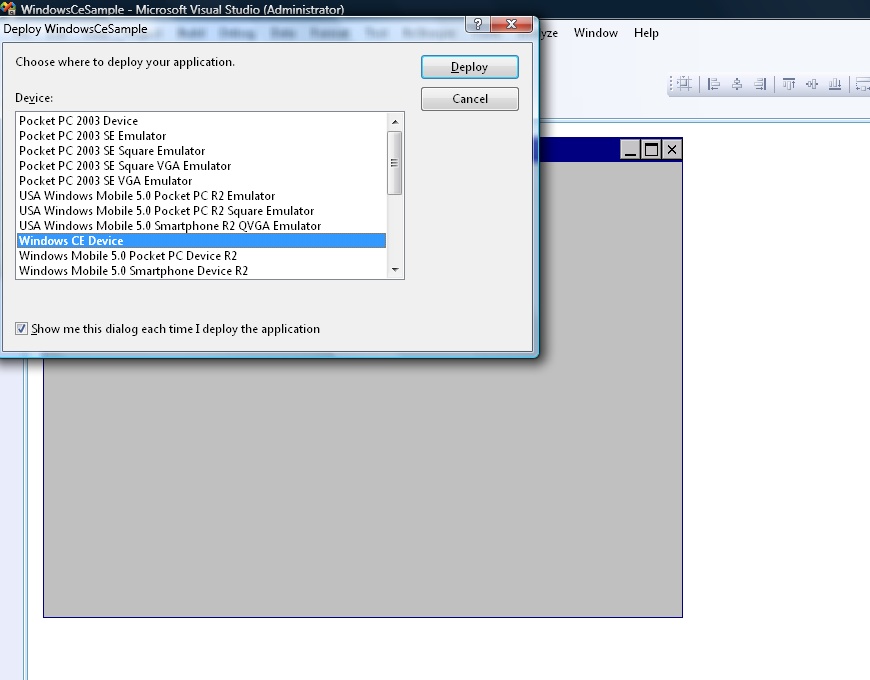
After pressing F5 to deploy the application, it will prompt you to choose a device. The Windows CE Device is the correct choice, but unless connection options are set correctly, you will only get the dreaded error "Unable to connect to device".
Before reading the rest of this post, refer to the MSDN article below.
How to: Connect to Windows CE Device Without ActiveSync
Below are the steps to connect to a Beckhoff device.
Step 1. Copy the Windows CE Debug Files to the Device
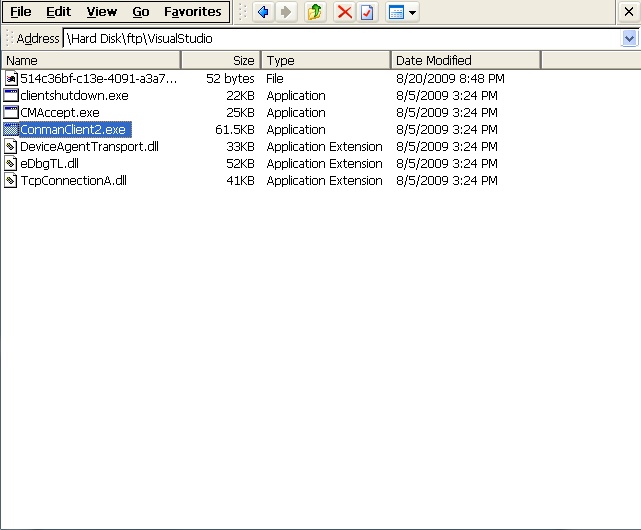
There are five files you need to copy to the Windows CE controller. The most important is ConmanClient2.exe. Executing this file on the device enables the device to listen for an incoming connection from Visual Studio.
Clientshutdown.exe
ConmanClient2.exe
CMaccept.exe
eDbgTL.dll
TcpConnectionA.dll
These files are located at the paths below in a standard Visual Studio 2005 SP1 or Visual Studio 2008 installation. You can copy the files to the device using FTP or by removing the compact flash card and inserting it into a USB reader.
X86 Processor (CX1000 Series):
C:\Program Files\Common Files\microsoft shared\CoreCon\1.0\Target\wce400\x86
ARM Processor (CX9000 Series):
C:\Program Files\Common Files\microsoft shared\CoreCon\1.0\Target\wce400\armv4i
Note, these will only work for Visual Studio 2005 SP1 or higher. But, why would you be using VS2005 without SP1?
Step 2. CoreConOverrideSecurity Registry Key
This step and also step 3 will require that you have access to the device. You will need to plug a monitor and mouse into the controller, or you can download the CE Remote Host terminal tool and connect remotely into the device. The mouse and monitor route is usually the easiest option.
After copying and executing ConmanClient2.exe, Visual Studio will still not be able to connect to the device. The problem seems to be because of a missing registry key. On the device, you can use the mouse and keyboard and go to Start > Run > Regedit to add this key that MSDN documents below.
You can eliminate the CMaccept step by disabling security on the device. To do so, use the Remote Registry Editor to set HLKM\System\CoreConOverrideSecurity = 1 DWORD value. Disabling security exposes your device to malicious attack and is not recommended unless you have provided appropriate safeguards.
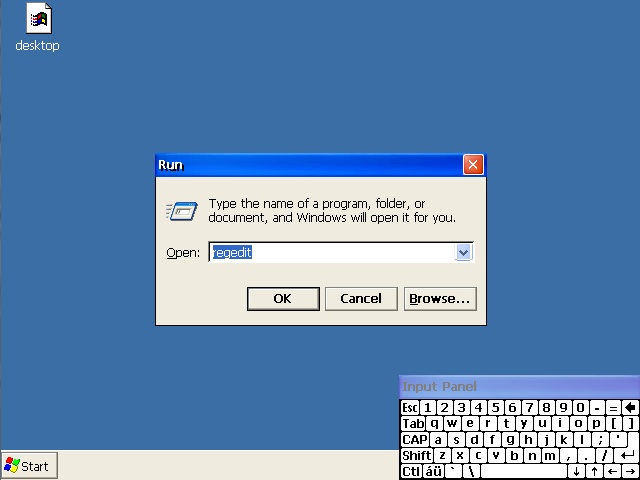
HLKM\System\CoreConOverrideSecurity = 1 DWORD If this key does not exist, use the regedit menu to add a new DWORD key and set the value to 1.

Step 3. Run ConmanClient2.exe on the Device
On the device, double click ConmanClient2.exe to start listening for a connection from Visual Studio.
MSDN says you should use a command prompt, and this is works as well. After executing ConmanClient2.exe at the command prompt, it will appear to just hang, with a flashing cursor. This is not a problem, it is just running waiting for a connection from Visual Studio.
If you need to restart the connection, run ClientsShutdown.exe then ConmanClient2.exe. CMaccept.exe should not make any difference since the registry key is set to 1.
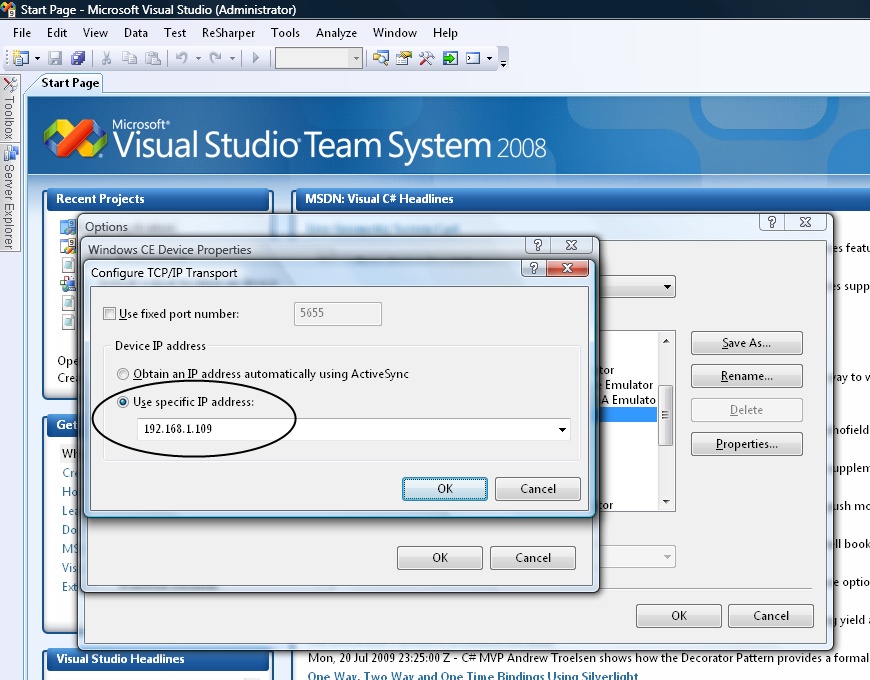
Step 4. Configure Visual Studio Options
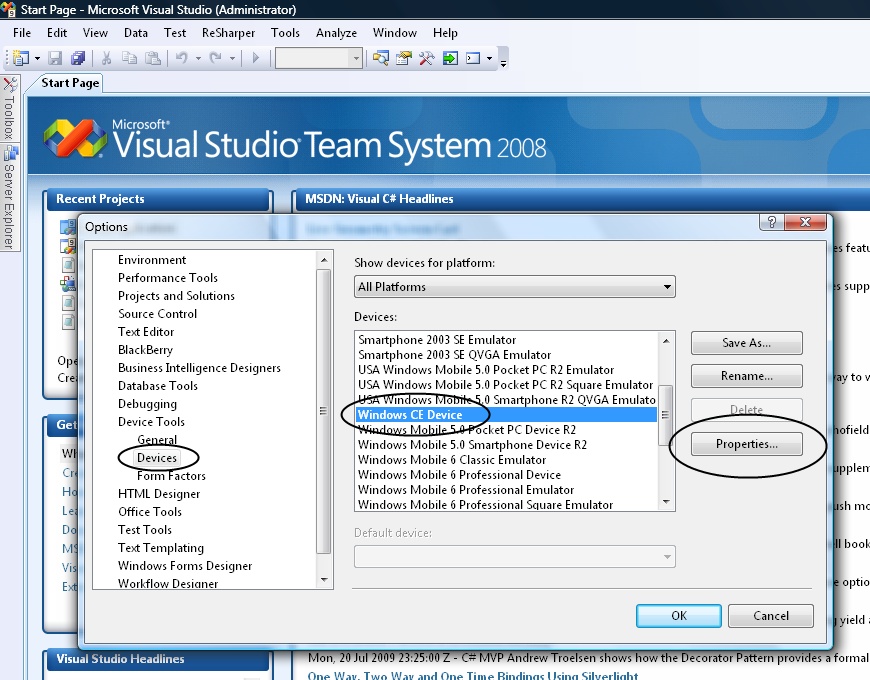
Visual Studio must be configured to connect to the device's IP Address as shown in the screenshots below.
Go to the Tools > Options > Device Tools > Devices menu to configure this setting.

Step 5. Deploy and Debug the Application
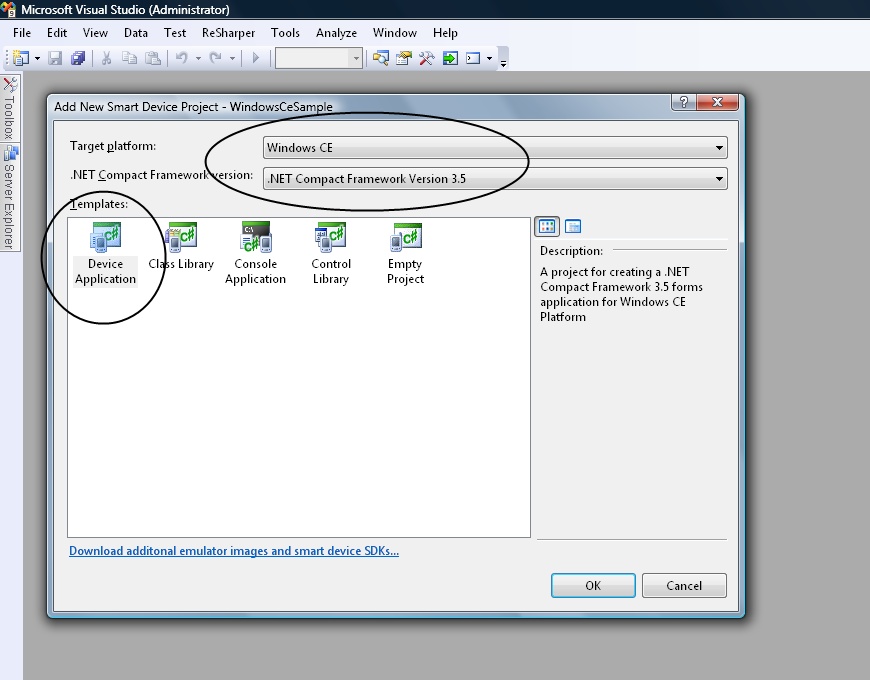
You can create and debug a .NET Windows CE Smart Device project much like any other type of application in Visual Studio.

Be sure to select Windows CE as the target and not Windows Mobile. You can use the 2.0 or 3.5 version of the Compact Framework. The framework will be deployed along with the application when you press F5. I will soon post more information, and probably an additional post, on how to keep the 3.5 Framework installed and persisted on the device through a reboot, however.
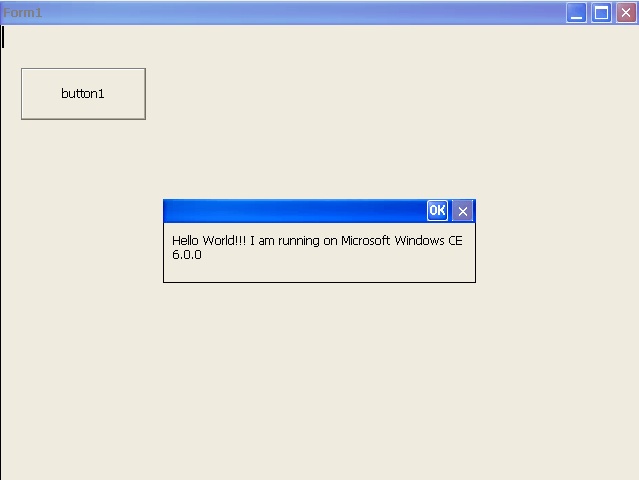
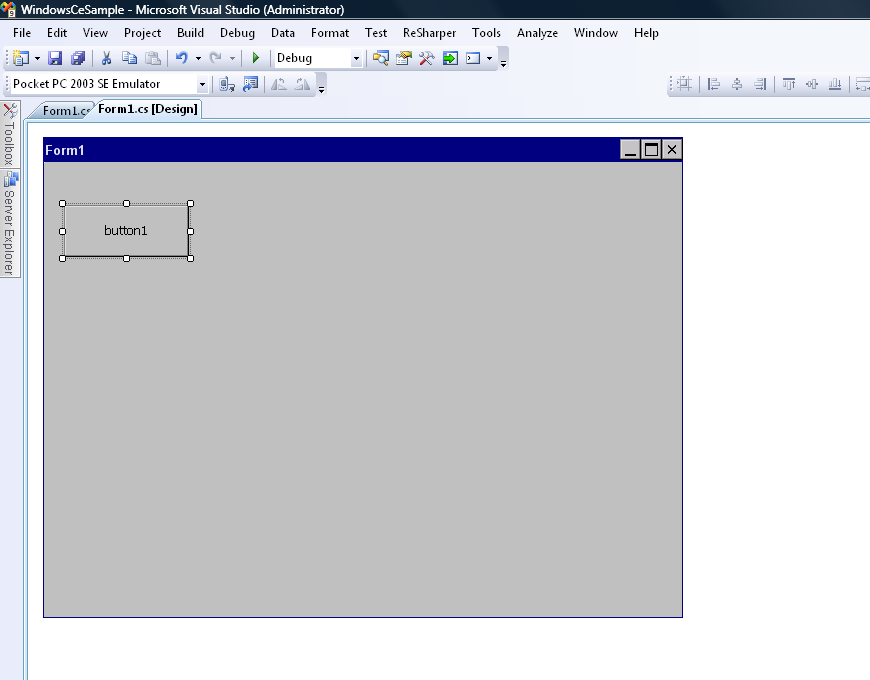
This sample application is simply a one button form that displays the OS version.
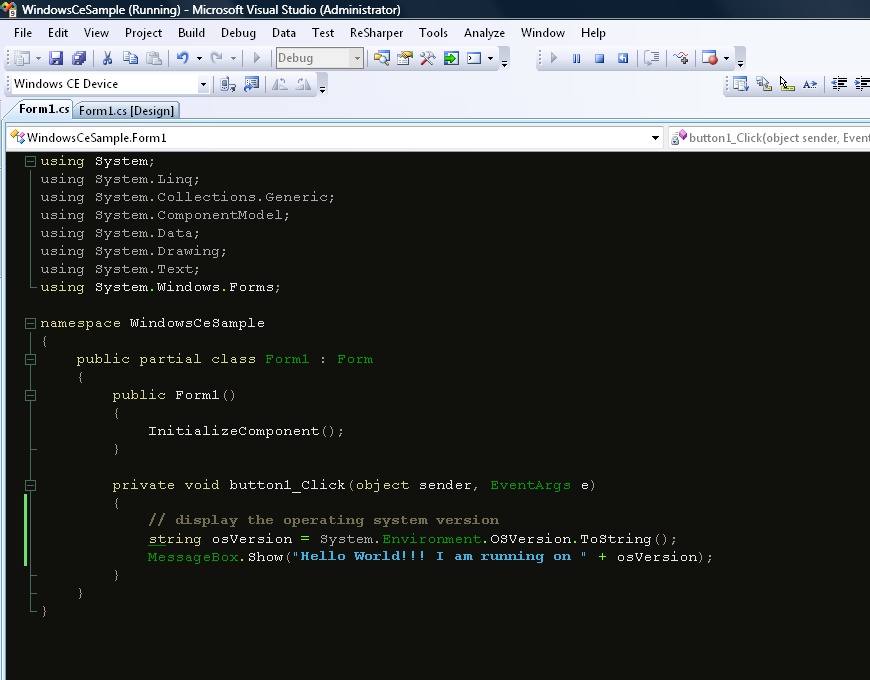
Press F5 to deploy and debug the application. A dialog to select the Windows CE smart device will appear. If all goes well, the connection will be made to the Beckhoff device across the IP connection.
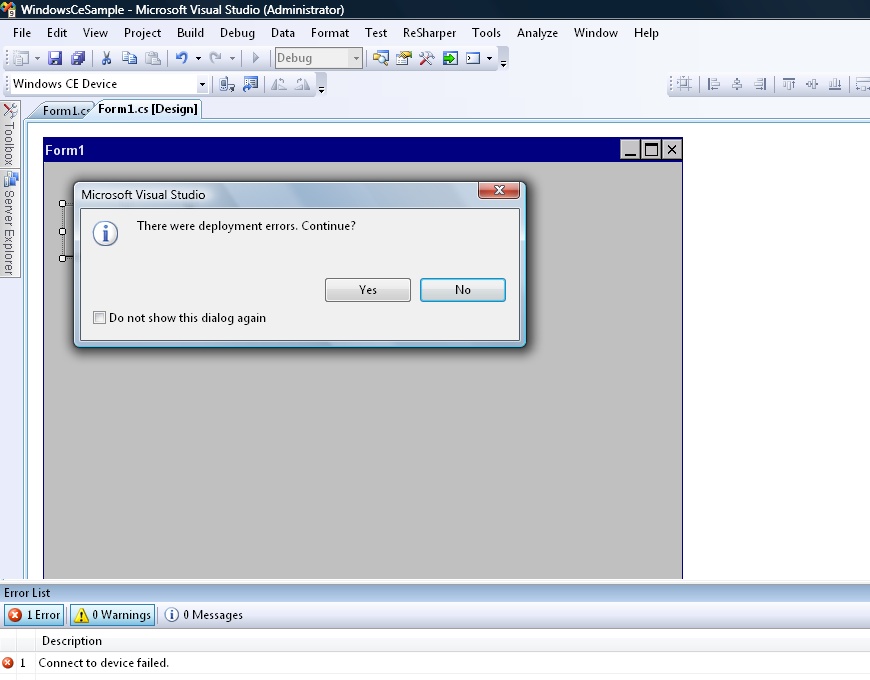
If Visual Studio cannot connect, it will give the error "Connect to Device Failed" error message. Review the steps outlined above, unfortunately there is not a lot of information about how to debug this problem. Make sure the IP address is set correctly and that you can ping the device.
If all goes well, the application starts on the Windows CE device in debug mode.